Welcome back! In this continuation of our series, we’ll walk through installing WordPress on a server where OpenLiteSpeed, your database server (MySQL/MariaDB), and PHP are already up and running.
If you missed the previous installment where we set up the LEMP stack and configured the database, be sure to check out [Setting Up WordPress Multisite on Ubuntu 24.04 with OpenLiteSpeed (Part 1)].
Let’s dive into the installation process.
Step 1: Download and Install WordPress
First, we need to download the latest version of WordPress and place it in the OpenLiteSpeed default document root.
Navigate to the Installation Directory
Open your terminal and move to the OpenLiteSpeed installation directory:
cd /usr/local/lsws/Create a new directory named wordpress and navigate into it:
mkdir wordpress
cd wordpress
Download and Extract WordPress
Download the latest WordPress package directly from the official source:
wget https://wordpress.org/latest.zipOnce the download completes, unzip the archive:
unzip latest.zipThis will extract the files into a subdirectory: /usr/local/lsws/wordpress/wordpress. To simplify the path, let’s rename the inner wordpress folder to html:
mv wordpress htmlYour final structure should look like this: /usr/local/lsws/wordpress/html.
Set Correct Permissions
For security and proper functionality, assign the correct ownership to the WordPress files. We’ll set the owner to nobody and the group to nogroup (standard for OpenLiteSpeed):
chown -R nobody:nogroup /usr/local/lsws/wordpressConfigure the Database Connection
Now, let’s configure WordPress to connect to your database. Navigate to the HTML directory:
cd /usr/local/lsws/wordpress/html/Rename the sample configuration file to activate it:
mv wp-config-sample.php wp-config.phpOpen the file using your preferred text editor (we’ll use nano here):
nano wp-config.phpLocate the database configuration section and update the values with the credentials you created in Step 4 of Part 1:
/** The name of the database for WordPress */
define('DB_NAME', 'wpdatabase');

/** MySQL database username */
define('DB_USER', 'wpuser');

/** MySQL database password */
define('DB_PASSWORD', 'StrongPasswordHere'); // Replace with your actual password

/** MySQL hostname */
define('DB_HOST', 'localhost');
Save your changes (Ctrl+O, then Enter) and exit the editor (Ctrl+X).
Step 2: Configure OpenLiteSpeed
With WordPress files in place, we now need to tell OpenLiteSpeed how to serve them.
Create the Virtual Host Configuration Directory
Navigate to the OpenLiteSpeed virtual hosts configuration folder:
cd /usr/local/lsws/conf/vhosts/Create a new directory for your WordPress site:
mkdir wordpressCopy the Base Configuration
To save time, we’ll copy the existing configuration from the default “Example” virtual host as a template:
sudo cp /usr/local/lsws/conf/vhosts/Example/vhconf.conf /usr/local/lsws/conf/vhosts/wordpress/vhconf.confEnsure the new directory has the correct permissions for the LiteSpeed admin user:
chown -R lsadm:nogroup /usr/local/lsws/conf/vhosts/wordpress/Configure via the Web Admin Console
While we’ve set up the file structure, the easiest way to finalize the virtual host settings is through the OpenLiteSpeed Web Admin Console.
- Log in to your OpenLiteSpeed dashboard.
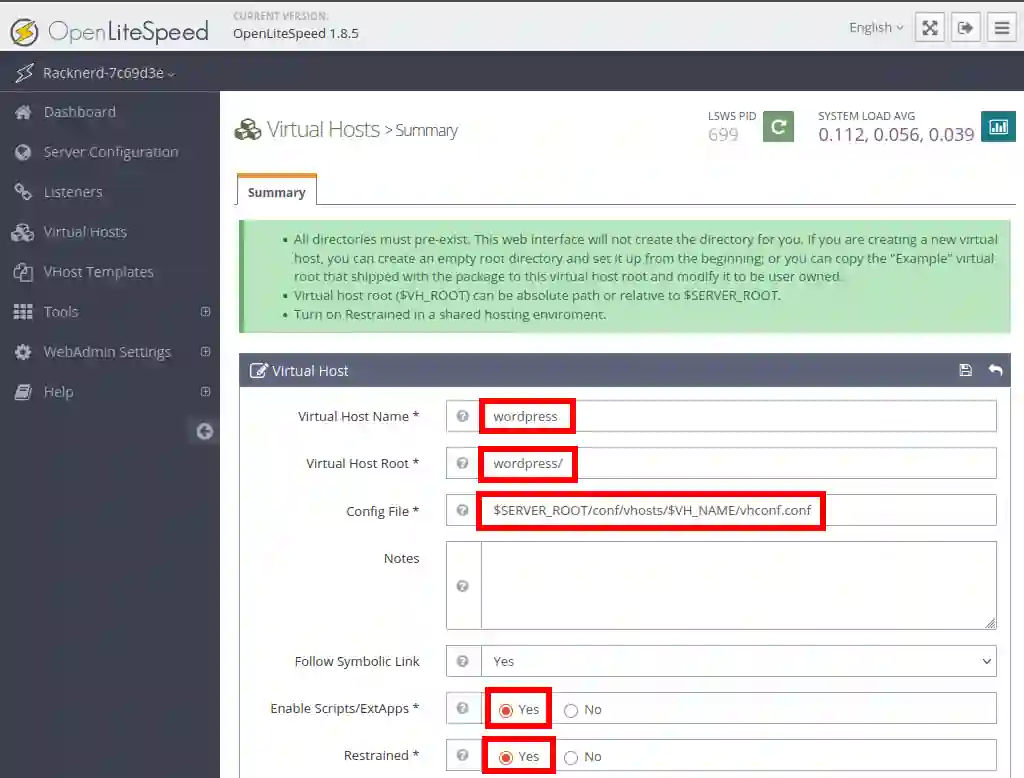
- Navigate to Virtual Hosts > Add.
- Enter
wordpressas the name and configure the settings to match your directory structure (Root Directory should point to/usr/local/lsws/wordpress/html). Click Save.
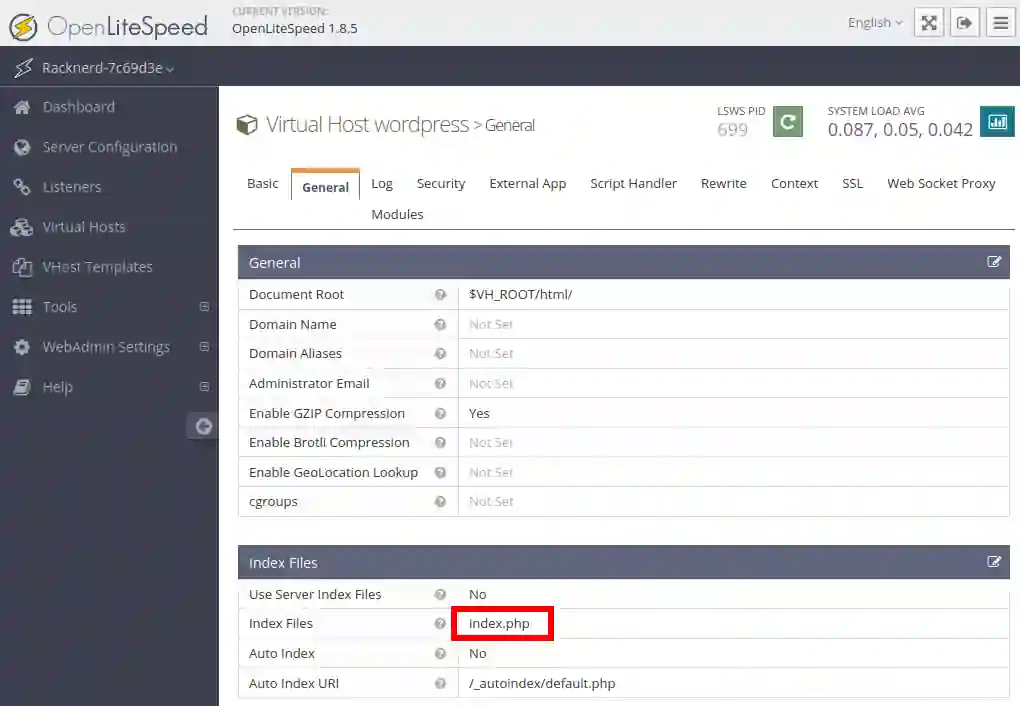
Update Index Files
Next, ensure PHP files are recognized as index files:
- Click on the newly created wordpress virtual host to edit it.
- Go to the General tab.
- In the Index Files field, add
index.phpto the list (e.g.,index.php, index.html). - Click Save.
Map the Virtual Host to a Listener
Finally, map the virtual host to a listener so it’s accessible via the web:
- Navigate to Listeners in the left-hand menu.
- Click View next to your active listener (usually port 80 or 443).
- Under Virtual Host Mappings, click View.
- Set the Virtual Host to
wordpressand the Domain to*(or your specific domain name). - Click Save.

4. Restart OpenLiteSpeed
Apply all changes by restarting the OpenLiteSpeed service:
/usr/local/lsws/bin/lswsctrl restartVerify Your Installation
Open your web browser and navigate to your server’s IP address (or domain name). If everything is configured correctly, you should see the famous WordPress installation screen with the “W” logo.
Follow the on-screen prompts to complete the WordPress setup (creating your admin account, site title, etc.).
🎉 Congratulations! You have successfully installed WordPress on OpenLiteSpeed.
Stay tuned for the next article in this series, where we’ll tackle configuring WordPress Multisite to manage multiple websites from a single installation.