Recently, I’ve been diving deep into WordPress. Initially, I used Vultr’s VPS, which offers a one-click WordPress image installation. Within minutes, my WordPress site was up and running—quick and hassle-free. Later, I tried other VPS providers, some of which didn’t offer one-click WordPress setups and only provided a clean OS installation. Being someone who enjoys tinkering, I wasn’t going to let that stop me. After spending days searching for tutorials and troubleshooting solutions, I finally got my WordPress site up and running.
This article, along with the upcoming ones in this series, documents the process I went through. It will serve as a reference for myself (and hopefully others) when setting up WordPress from scratch in the future.
This guide is heavily inspired by this forum post.
Step 1: Update the System
For this installation, we’ll start with a fresh server. After performing a clean OS installation, the first step is to update all system packages to their latest versions. Run the following command:
sudo apt update -y && sudo apt upgrade -yStep 2: Install OpenLiteSpeed
First, download the OpenLiteSpeed installation repository using the following command:
wget -O openlitespeed.sh https://repo.litespeed.shOnce the script is downloaded, add the OpenLiteSpeed repository to your APT sources:
sudo bash openlitespeed.shYou should see output similar to this:
root@host:~# sudo bash openlitespeed.sh
LiteSpeed repository has been setup!
With the repository added, proceed with the installation:
sudo apt install openlitespeed -yAfter the installation completes, start and enable the lshttpd (OpenLiteSpeed) service:
sudo systemctl start lshttpd && sudo systemctl enable lshttpdTo verify the status of the OpenLiteSpeed service, use:
sudo systemctl status lshttpdYou should see output similar to this:
● lshttpd.service - OpenLiteSpeed HTTP Server
     Loaded: loaded (/etc/systemd/system/lshttpd.service; enabled; preset: enabled)
     Active: active (running) since Tue 2024-09-17 18:01:54 CDT; 4min 5s ago
   Main PID: 3935 (litespeed)
     CGroup: /system.slice/lshttpd.service
             ├─3935 "openlitespeed (lshttpd - main)"
             ├─3946 "openlitespeed (lscgid)"
             ├─3975 "openlitespeed (lshttpd - #01)"
             ├─3976 "openlitespeed (lshttpd - #02)"
             └─3977 "openlitespeed (lshttpd - #03)"

Sep 17 18:01:52 host.test.vps systemd[1]: Starting lshttpd.service - OpenLiteSpeed HTTP Server...
Sep 17 18:01:52 host.test.vps lswsctrl[3908]: [OK] litespeed: pid=3935.
Step 3: Access the OpenLiteSpeed Admin Dashboard
Once OpenLiteSpeed is installed, you can access its web-based admin dashboard via http://YourIPAddress:7080. Before accessing it, you need to set up an administrator username and password. Run the following command to invoke the setup script:
sudo bash /usr/local/lsws/admin/misc/admpass.shWhen prompted, enter the administrator username (default is admin; you can press Enter to accept it) and set a strong password:
root@host:~# sudo bash /usr/local/lsws/admin/misc/admpass.sh
Please specify the user name of administrator.
This is the user name required to login the administration Web interface.
User name [admin]: (Press Enter to accept default)
Please specify the administrator's password.
This is the password required to login the administration Web interface.
Password: YourStrongPasswordHere
Retype password: YourStrongPasswordHere
Administrator's username/password is updated successfully!
Once completed, log in to the OpenLiteSpeed dashboard using the credentials you just set at http://YourIPAddress:7080.
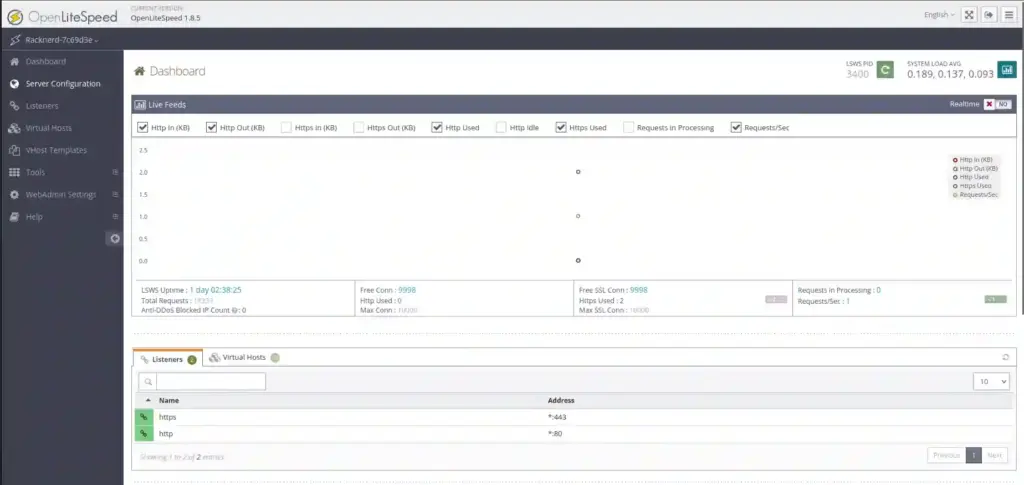
After logging in, you’ll see the dashboard. It’s similar with following image.
It’s recommended to change the default listening port from 8088 to 80. To do this:
- Navigate to Listeners → View in the left-hand menu.
- Click the Edit button.
- Change the port to
80and click the Save icon (top-right corner). - Restart the OpenLiteSpeed service:
/usr/local/lsws/bin/lswsctrl restartNote on Port 80 Permissions
Binding to port 80 typically requires administrative privileges since it’s a low-numbered port reserved for system services. On most Linux systems, regular users cannot bind to these ports. However, there are ways to resolve this:
Method 1: Using setcap
The setcap command allows you to grant specific permissions to programs, enabling non-root users to bind to low-numbered ports.
Install setcap:If setcap isn’t already installed, you can install it via your package manager. For Ubuntu/Debian:
sudo apt-get install libcap2-binGrant Permissions to OpenLiteSpeed:Run the following command to allow the ols user to bind to port 80:
sudo setcap 'cap_net_bind_service=+ep' /usr/local/lsws/bin/openlitespeedAdjust the path (/usr/local/lsws/bin/openlitespeed) if your installation differs.
Restart OpenLiteSpeed:After modifying permissions, restart the service:
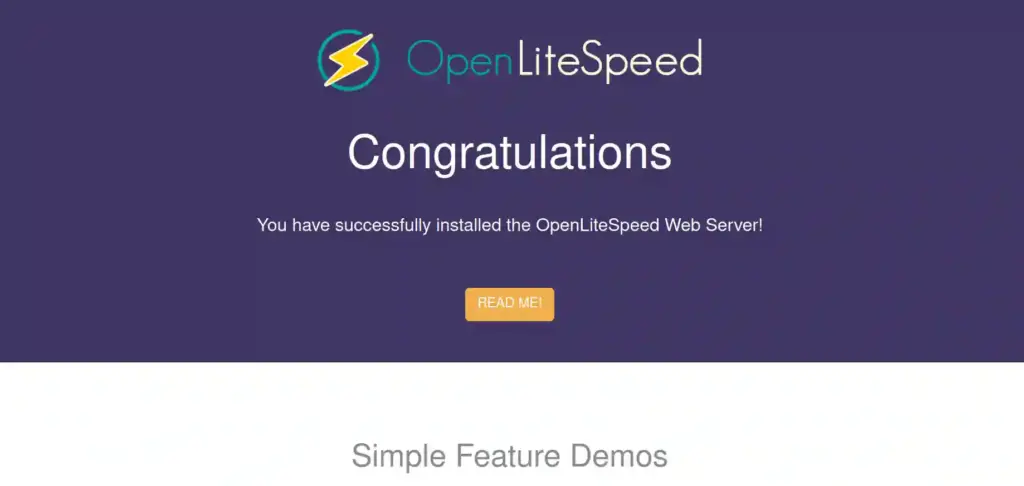
/usr/local/lsws/bin/lswsctrl restartNow, you can access your site via http://YourIPAddress. If everything is configured correctly, you should see a page similar to the one shown below.
Step 4: Install MariaDB and Create a Database
To install the MariaDB database server, run:
sudo apt install mariadb-server -yOnce installed, start and enable the MariaDB service:
sudo systemctl start mariadb && sudo systemctl enable mariadbCheck the service status with:
sudo systemctl status mariadbExpected output:
● mariadb.service - MariaDB 10.11.8 database server
     Loaded: loaded (/usr/lib/systemd/system/mariadb.service; enabled; preset: enabled)
     Active: active (running) since Wed 2024-09-18 10:37:23 CDT; 1min 49s ago
       Docs: man:mariadbd(8)
             https://mariadb.com/kb/en/library/systemd/
   Main PID: 11115 (mariadbd)
     Status: "Taking your SQL requests now..."
      Tasks: 10 (limit: 30450)
     Memory: 78.6M (peak: 82.1M)
        CPU: 1.175s
     CGroup: /system.slice/mariadb.service
             └─11115 /usr/sbin/mariadbd
Secure your database installation by running:
sudo mysql_secure_installationNext, create a database and user for WordPress:
Log in to MySQL:
sudo mysql -u root -pExecute the following SQL commands:
CREATE DATABASE wordpressdb;
CREATE USER 'wordpressuser'@'localhost' IDENTIFIED BY 'password';
GRANT ALL PRIVILEGES ON wordpressdb.* TO 'wordpressuser'@'localhost';
FLUSH PRIVILEGES;
EXIT;
Step 5: Install PHP and Extensions
Finally, install PHP and the necessary extensions for WordPress to function properly:
sudo apt install lsphp83 lsphp83-mysql lsphp83-common lsphp83-curl lsphp83-imagick -yReturn to your browser and visit http://YourIPAddress. Scroll through the page until you find a section similar to the one shown below, then click the button highlighted in the red box.
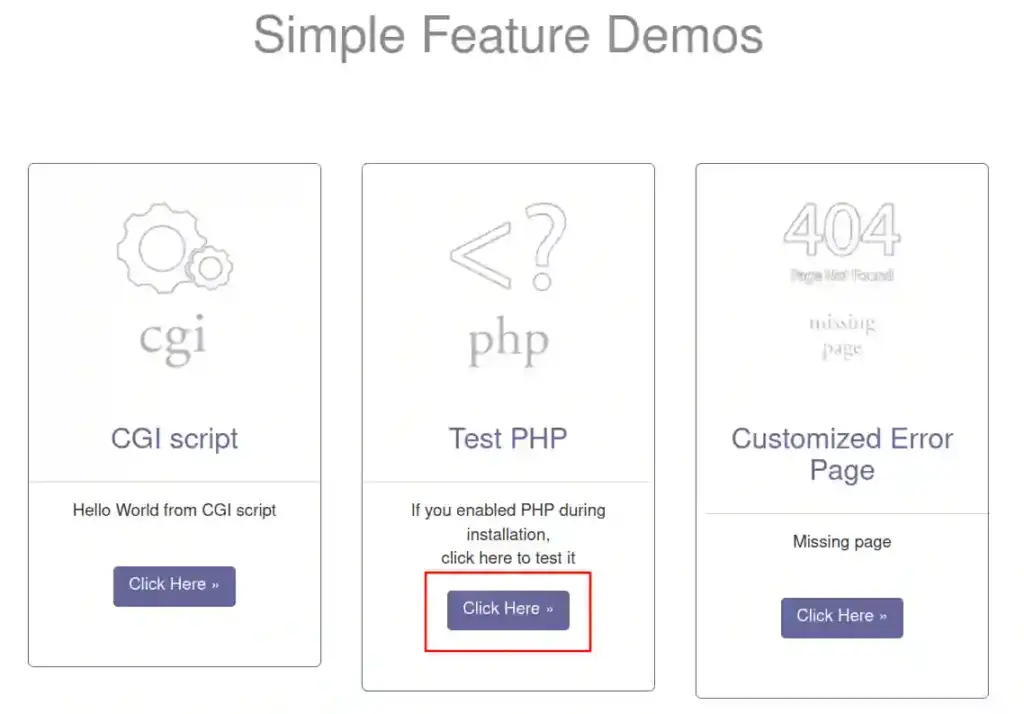
If you see a page like the one illustrated, congratulations—PHP is successfully installed!

This concludes Part 1 of our series. In the next article, we’ll cover how to install and configure WordPress itself. Stay tuned!